
How to Fix Sinking Garage Foundation: A Step-by-Step Guide
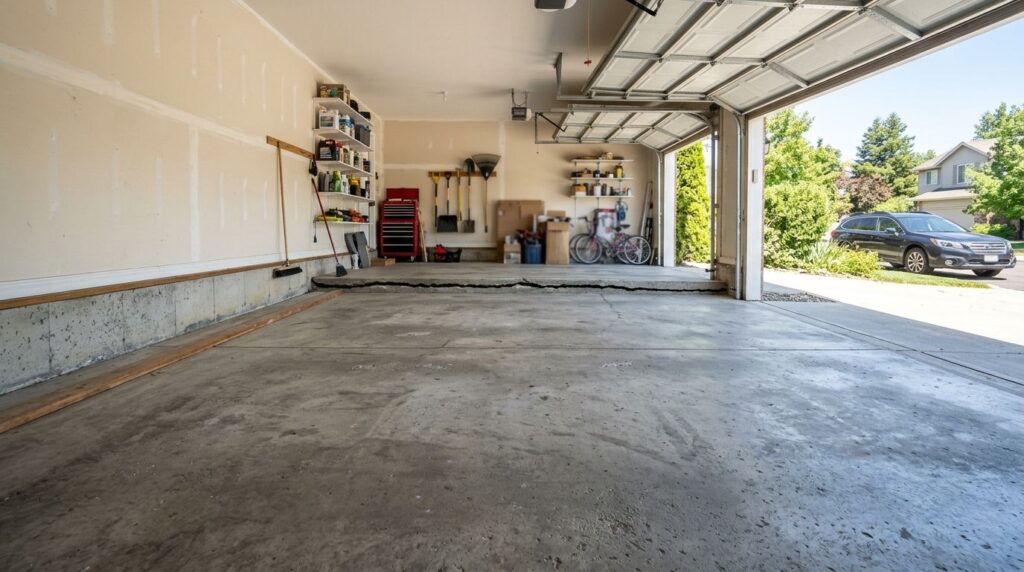
Table of Contents
- Why Garage Foundations Settle in the Front Range
- Recognizing Warning Signs Before You Begin
- Step 1: Confirm the Slab and Identify What Is Actually Sinking
- Step 2: Control Drainage and Moisture Around the Garage
- Step 3: Lift a Settled Slab with Polyurethane Foam
- Step 4: Repair Cracks and Joints with Epoxy and Sealing
Why Garage Foundations Settle in the Front Range
If you’re wondering how to fix a sinking garage foundation, understanding why it settled in the first place is the first step. In the Front Range, expansive clay soils and seasonal moisture changes commonly contribute to uneven support beneath garage slabs. Poor compaction of backfill, water erosion, and plumbing leaks beneath the slab further accelerate settlement, causing the floor to drop while the foundation walls often remain stable.
A space between the garage slab and the garage walls does not always suggest that something happened at the base of the home since the garage slab will usually be poured independent of the foundation wall. The separation may just mean that your garage floor has simply fallen slightly over time. This separation isn’t a big deal as far as the primary foundation at the base of the house goes.
This makes it a logical step towards learning what the warning symptoms may be and if a specialist examination might be necessary.
Key Takeaways
- Before you research how to fix a sinking garage foundation, it pays to know what warning signs to look for.
- Most garage floors are poured separately as independent slab-on-grade slabs and can settle on their own without indicating broader foundation failure.
- Once a sinking concrete slab has been confirmed, the next step is to determine whether water is driving the movement.
- After we’ve addressed drainage and moisture control around your garage, we often still need to correct persistent slab settlement directly.
- After stabilizing the slab, we’ll be looking at fixing any cracks and joints which may re-open without proper sealing.
Recognizing Warning Signs Before You Begin
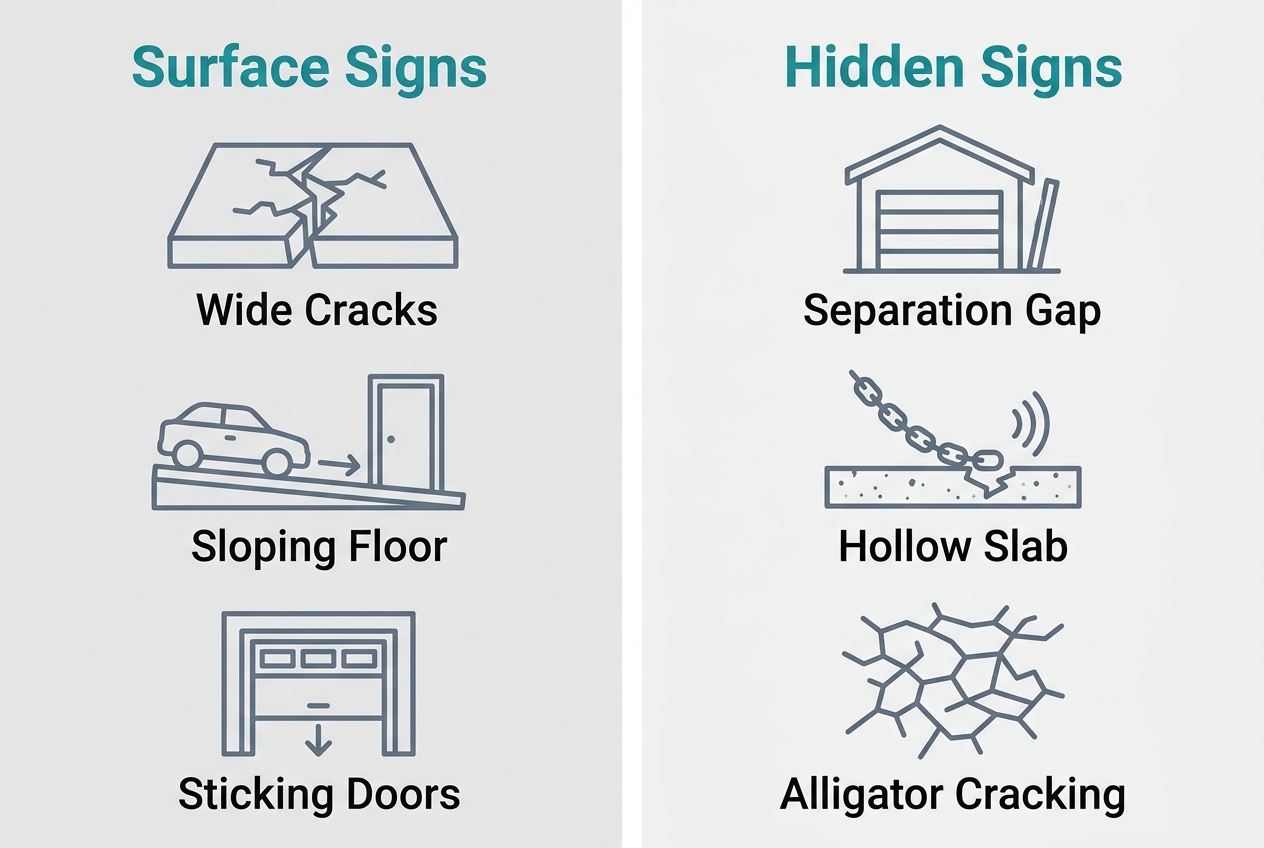
Before you research how to fix a sinking garage foundation, it pays to know what warning signs to look for. Cracks wider than one-eighth inch and jagged patterns often signal structural shifting beyond normal settling. Alligator cracking along wheel paths indicates the concrete is flexing downward into voids created by subgrade failure. Vertical joint displacement over one-quarter inch at control joints points to active subgrade movement that requires attention.
Less obvious signs include sloping floors that let vehicles roll unexpectedly, hollow sounds when dragging a chain across the slab revealing hidden voids, and separation gaps between an attached garage and the main house wall that compromise energy efficiency and security. Misalignment of garage doors that stick or jump tracks frequently reflects foundation movement beneath the structure.
At this point you must confirm, via an on-site professional assessment, what is actually sinking beneath the slab before choosing a repair method. Once these signs are present, confirming what is actually sinking beneath the slab through a professional on-site assessment is the necessary first step before choosing a repair method.
Step 1: Confirm the Slab and Identify What Is Actually Sinking
Most garage floors are poured separately as independent slab-on-grade slabs and can settle on their own without indicating broader foundation failure. A gap between the slab and the foundation wall often signals the floor has dropped while the wall remains stationary.
Slab settlement can be caused by several issues including poor compaction of fill material, erosion due to wet supporting soils underneath the concrete slab, pipe leakage under slab and heavy point loadings upon the concrete surface. We determine why a concrete slab may settle by measuring gaps around edges, using a straight edge/level to check elevation differentials across the slab surface, and observing where standing water on the outside drains near the slab.
If the concrete has split up in many pieces or if there might be a plumbing leak that will require that you take up the concrete, then get this evaluated by way of a professional. Documenting gap widths, level readings, and photographs provides the evidence needed to guide the repair approach.
Step 2: Control Drainage and Moisture Around the Garage
Once a sinking concrete slab has been confirmed, the next step is to determine whether water is driving the movement. In Colorado’s expansive clay soils, moisture cycles cause the ground to swell and shrink, which can worsen settlement and cracking beneath the slab.
We recommend three practical actions to stabilize the soil before any lifting work begins. First, make sure your downspouts and gutters have been cleaned out so that water runs away from the structure. Next, position your downspout outlets so they discharge at least six feet from the garage, preventing runoff from pooling at the slab edges. And thirdly, regrade the soil in such a way as to allow for some gentle slope away from the foundation, so that water does not sit on top of the settled concrete. If this has been done then once again the concrete slab can be lifted by a professional company instead of being replaced.
Step 3: Lift a Settled Slab with Polyurethane Foam
After we’ve addressed drainage and moisture control around your garage, we often still need to correct persistent slab settlement directly. In this case, our polyurethane foam lifting will be utilized. We inject a high-density, expanding foam through strategically placed holes—typically 5/8-inch to 1 inch in diameter—filling voids beneath the sunken slab to raise it back into position.
It was designed for load-bearing applications with a closed cell structure which is both waterproof and sets up quickly. Often times you’ll be able to start using your garage floor again within hours of completing the job, without having to replace the entire slab. Because the foam is lightweight, it adds minimal stress to already-sensitive soils and the small injection holes minimize disruption to your property. Preventing moisture from entering and causing erosion below grade as well as settling of the soil in the future will help keep all that work done previously stable too.
Step 4: Repair Cracks and Joints with Epoxy and Sealing
After stabilizing the slab, we’ll be looking at fixing any cracks and joints which may re-open without proper sealing. If you notice hairline cracks developing on the surface of your garage floor then don’t wait until walls start bowing or the structure of the building settles further down. Structural epoxy injection can help to repair the load bearing integrity in your slab before the condition gets worse to the extent that it poses a danger to your house.
We also chase our cracks, a mechanical grinding method that creates a uniform groove allowing the sealant to flow in while still permitting the slab to move without cracking again. After filling the joints with epoxy or sealant we perform a water test to ensure they are watertight so we don’t have to worry about moisture and Colorado’s freeze/thaw cycles causing further damage. In doing this we know the repair addressed not only the structural aspects but the regional soil conditions that affect the Front Range’s concrete.
Step 5: Install Helical Piers for Deep Structural Stabilization
Although there may be surface cracks in the concrete that have been filled using epoxy crack sealant, there can also be much more serious problems if the underlying soil is unstable. In homes throughout Littleton and Denver, our certified installers choose helical piers when on-site inspections reveal significant instability at depth.
First we evaluate the existing soil condition and look at where the load bearing strata resides. Then we set in place the galvanized helical piers down to that depth, screwing each pier into stable ground until its base reaches the underlying good strata. We attach each pier to the foundation, creating a permanent structural connection that halts further settlement. Because helical piers provide immediate load-bearing capacity, we can reconnect and protect the garage slab without waiting for concrete to cure.
Step 6: Reconnect and Protect an Attached Garage
When the deep stabilization work is complete we then move on to the final task which entails getting the concrete back attached to the home and sealed up. There must be no gaps at all where a garage attaches to the main body of the house because you will get energy loss from drafts in your home and this can become a weak link allowing pests and even people to gain entry into your home. The way that we handle this type of situation would be to chase any cracks out with some mechanical grinders followed by putting down flexible sealant to make sure there is another barrier and we use polyurethane foam lifting to set the concrete slab back onto the foundation and attach it once again to the house.
Displacement during setting often causes garage doors to stick or jam, signaling the need for structural attention. Our method consists of injecting high-density polyurethane underneath the slab to fill voids and compact the soil, restoring proper elevation without invasive replacement. In instances wherein the slab itself is too damaged to level, full replacement becomes the only durable solution, leading into the next step.
Step 7: Plan Slab Replacement When Repair Is Not Enough
Once we’re done addressing the slab and the garage has been reconnected and protected, there will come a point when repair methods like polyurethane foam lifting are no longer sufficient and full slab replacement becomes necessary. Replacement involves removing the damaged slab, addressing any compromised subgrade, and pouring new concrete.
Fresh concrete takes at least seven days to get up to the required strength, so trucks can’t start using the garage right away. In certain situations, for heavy loads, or ongoing subgrade problems, the contractor might recommend using helical steel piles to put in the new floor.
If there is vertical joint movement greater than 1/4 inch or alligator cracking in the wheel tracks, these conditions indicate missing subgrade support and the need for a professional diagnosis before proceeding. If you’re located near Denver or Littleton, consult a licensed structural engineer to confirm whether replacement is required and to design the appropriate solution for your Littleton or Denver area home.
Troubleshooting Common Setbacks During Garage Foundation Repair
Usually, setbacks during garage foundation repair point to deeper soil instability rather than a flaw in the concrete itself. Often, these problems arise when the subgrade beneath the slab has shifted or eroded, leaving voids that undermine the repair’s long-term stability. The problem tends to crop up when the ground below gets out of whack due to erosion or movement, which makes everything that’s built over it weak and unstable.
Key diagnostic indicators of an underperforming repair include:
- Alligator cracking along wheel paths, signaling the slab is flexing downward into unsupported voids
- Vertical joint displacement exceeding 1/4 inch, which indicates active subgrade movement
- Hollow sounds when dragging a chain across the floor, revealing hidden subsurface voids
When a polyurethane foam lift fails to resolve settling, it typically reflects deeper structural instability rather than a material issue. Foam lifting achieves load-bearing capacity within 15 to 30 minutes, but if the slab continues to drop or cracks reappear, helical steel piers or full slab replacement may be necessary. We always recommend consulting a licensed structural engineer for a definitive diagnosis before committing to another repair cycle. Every project also requires on-site inspection to confirm the diagnosis and refine the remedy—diagnoses based solely on photos or descriptions are unreliable.
It helps owners move from merely observing their problem to taking action, ensuring the repair they choose matches the slab’s actual condition.
Frequently Asked Questions
What are the warning signs that a garage foundation is sinking and requires professional repair?
Jagged cracks wider than one-eighth inch and alligator cracking along wheel paths indicate structural shifting beyond normal settling. Sloping floors that let vehicles roll unexpectedly or hollow sounds when dragging a chain across the slab reveal hidden voids. Vertical joint displacement over one-quarter inch at control joints signals active subgrade movement that requires attention.
How do helical piers differ from other foundation repair methods for garages?
Helical piers use helix-shaped steel plates welded to central hubs, screwed into stable soil strata to provide immediate load-bearing support. They reach deep load-bearing layers and are galvanized for corrosion resistance, making them stronger for heavily loaded structures or severe foundation failure compared to surface-level methods.
Can a garage foundation be repaired if it is attached to the main house structure?
Yes, a garage foundation attached to the main house can be repaired. Helical piers can stabilize the slab, and polyurethane foam lifting can restore elevation. Cracks and gaps are then sealed with epoxy and flexible sealants to reconnect the garage to the house without energy loss or security risks.
How can Helical Piers be Used to Stabilize a Sinking Garage Foundation?
Helical piers are installed by screwing galvanized steel piers with helix plates into stable soil layers beneath the slab. Once embedded, they are attached to the foundation to halt further settlement. This method provides immediate load-bearing capacity, allowing the slab to be leveled and reconnected without waiting for concrete curing.
Is it Possible to Lift a Sinking Garage Foundation Back to its Original Level?
Yes, a sinking garage foundation can be lifted back to its original level using polyurethane foam lifting. High-density, expanding foam is injected through small holes to fill voids beneath the slab, raising it within hours. The process is non-invasive and allows the slab to be used quickly after completion.
Choosing the Right Repair for Your Sinking Garage
Still, even though you’ve removed some typical obstacles, the major choice is whether or not your garage needs a minor patch job or a major renovation. Slab repair methods like foam injection could be used for shallow footings issues located near Denver. A fast, strong repair is possible when using foam lift with little 5/8 inch injection ports and closed cell moisture resistant foam which will regain its load bearing properties in around 15-30 mins. This approach focuses on ensuring longevity and durability over cosmetic repairs. Your foundation might require full removal and replacement, slab levelers, or simply maintenance depending upon the damage.
When there is additional instability, we may turn to helical piles/tiebacks that serve as more powerful foundations in order to stabilize what has been disturbed. Our specialists work at the scene to determine where changes need to be made based upon how bad things have become and only make alterations when appropriate, instead of doing things out-of-the-box.
The right way to fix a sinking garage foundation starts with a professional evaluation—estimates are preliminary until confirmed in writing after an on-site inspection. Contact us today to schedule yours.
Schedule Your Garage Inspection Today
You’ve now walked through every step of fixing a sinking garage foundation, from recognizing warning signs to choosing between polyurethane foam lifting, crack sealing, and helical piers. The right repair ultimately depends on what an on-site inspection reveals about the soil and slab beneath your garage. Rocky Mountain Steel Piering has served homeowners from our Littleton, Colorado office since 1996 as a family-owned company. Our trained, certified installers use proven methods, including MacLean/Dixie helical piers and moisture-resistant foam, to restore settled slabs. Because estimates are preliminary until confirmed on-site, scheduling an evaluation is the smartest first move. Call us at +1 303-471-1155 to discuss your garage concerns with our team. We’ll help you determine whether lifting, sealing, or deeper stabilization is the right fit for your situation.