Seismic Retrofit Foundation Bolting: Complete Colorado Home Guide
Table of Contents
- Understanding Seismic Retrofit Foundation Bolting in Colorado
- Preparing for a Seismic Retrofit Foundation Bolting Project
- Assessing the Foundation and Site Conditions
- Installing Mudsill Bolting for Critical Connections
- Adding Cripple Wall Bracing for Lateral Support
- Selecting and Installing Anchor Bolts for Seismic Loads
Understanding Seismic Retrofit Foundation Bolting in Colorado
Seismic retrofit foundation bolting is the process of securing a home’s sill plate to its concrete foundation with anchor bolts, designed to resist earthquake forces. Many Colorado homes, especially those built before modern seismic codes, lack this critical connection and can benefit from retrofitting. As a family-owned company since 1996, we understand these regional challenges.
While seismic retrofit foundation bolting anchors the sill plate, complementary techniques such as cripple wall bracing and mudsill bolting complete the load path. These measures work together to transfer lateral loads safely into the foundation. We reference authoritative standards like the FEMA seismic retrofit guidelines to specify proper bolt spacing and embedment depth, ensuring each component performs as intended under stress.
Because every Colorado home has unique soil and structural conditions, we provide custom assessments. Contact RMS Seismic Solutions for a tailored quote based on an on-site inspection. With over 30 years serving Littleton and the Denver metro area, we specialize in helical pier systems and foundation repair to ensure your retrofitting project meets national standards. In the next section, we’ll explore how cripple wall bracing further secures your home.
Preparing for a Seismic Retrofit Foundation Bolting Project
Now that you understand the importance of seismic retrofit foundation bolting for your home’s safety, let’s cover the essential steps to prepare for your project. A successful retrofit starts long before any physical work begins, with careful planning and professional assessments. Our family-owned team at Rocky Mountain Steel Piering, Inc., established in 1996, brings decades of experience to help guide you through this critical preparation phase.
First, you must obtain a structural engineer’s inspection and a written foundation report. This forensic evaluation, which typically involves precise elevation measurements and crack mapping, provides the engineering analysis necessary to determine the correct bolting and bracing specifications. The cost of a structural engineer’s report varies by location and property complexity; according to our internal guides, fees in Colorado can range from $500 to $1,500, though site conditions ultimately dictate the final price.
As you prepare, gather essential property details—such as construction year, foundation type, and crawlspace photos—to streamline the inspection process. You can also use RMSS’s resources to connect with a licensed professional engineer in the Denver or Littleton areas. For qualifying homes in California, the California Seismic Retrofit Program provides financial assistance for foundation bolting and cripple wall bracing, including mudsill bolting projects. The California Residential Mitigation Program, which has funded over 40,000 retrofits to date, can significantly offset costs for eligible homeowners.
Once your engineering report and any program approvals are in hand, you are ready for the installation phase. Remember, all recommendations should be verified by a licensed professional, and we provide custom quotes only after a thorough on-site inspection—actual project requirements depend on your unique site conditions.
Assessing the Foundation and Site Conditions
Before beginning a seismic retrofit foundation bolting project, assess the foundation and site conditions. As a family-owned and operated company since 1996, we know thorough inspection prevents missed issues.
Step-by-Step Foundation Inspection
Use a 4-foot level across floor areas to detect slope and measure cracks, noting width over ⅛ inch and direction. Probe sill plates for rot or termite damage, which weakens anchorage. Look for ineffective mudsill bolting. Anchor systems must meet ICC-ES AC358 standards—engage a licensed structural engineer.
Why a Thorough Assessment Matters
A thorough assessment is the foundation of seismic retrofit foundation bolting—missed settlement cracks can cause failure. In the Denver area, seasonal clay movement masks active cracks. For historic homes, foundation stabilization for historical renovations documents weak points before bolting, ensuring the bolting plan addresses every vulnerability.
Inspection Tips
Bring a flashlight, camera, and notepad. Inspect cripple wall bracing connections for distress. As The Experts in Steel Piers, we recommend documenting every defect with time-stamped photos and a floor-plan sketch, then checking previous repair patches for re-cracked epoxy. Re-probe sill plates for hidden rot before concluding the visual screen.
With your assessment documented, you’re ready to choose the right bolting solution and installer.
Installing Mudsill Bolting for Critical Connections
How to Install Mudsill Bolts
To achieve the load path described earlier, proper installation of mudsill bolting is crucial. We follow FEMA guidelines for anchor placement and technique.
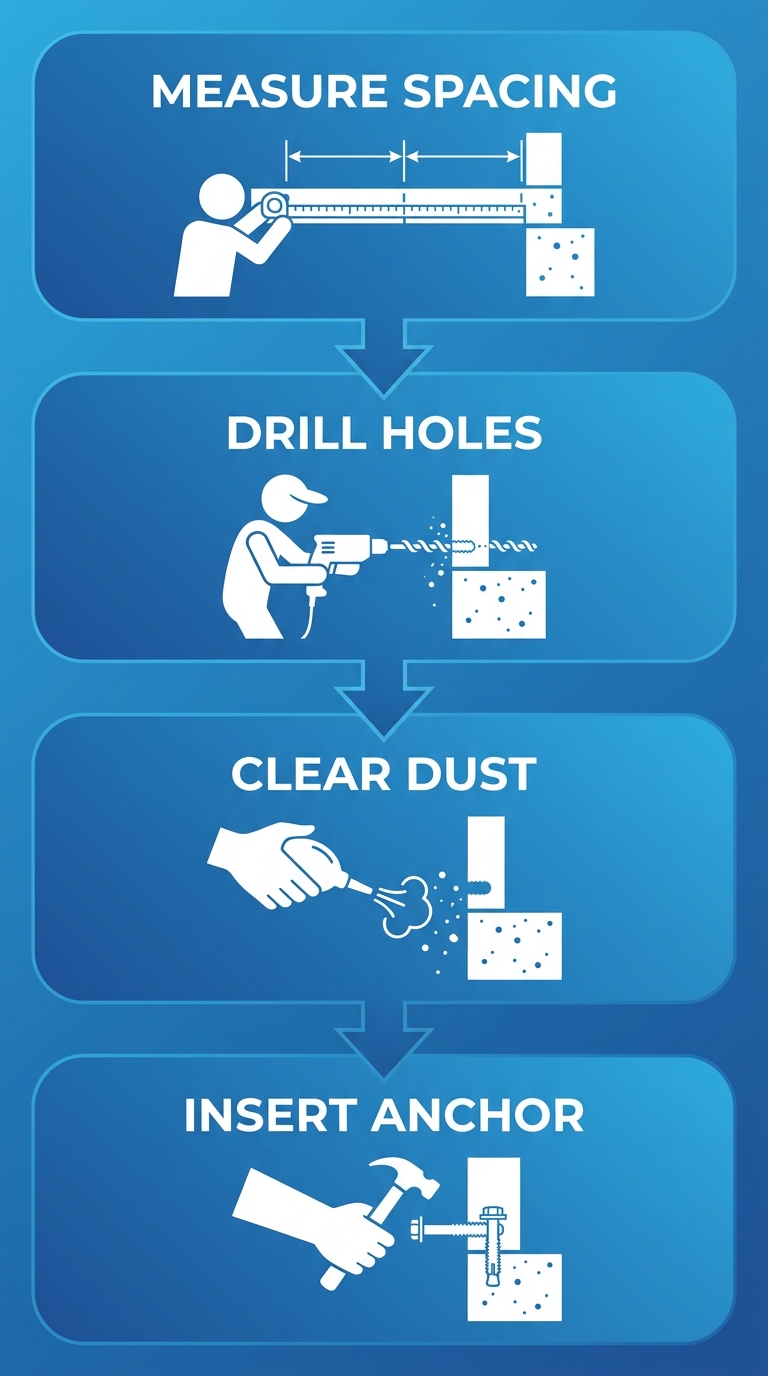
Four-step mudsill bolt installation process visualization.
- Locate bolts within 12 inches of each end and 6 feet on center.
- Drill holes 1/4 inch larger than anchor diameter to at least 7-inch depth.
- Clean holes with compressed air and a brush.
- Insert anchors (expansion for solid concrete, epoxy for cracked) and torque to 50–80 ft-lbs.
Why Proper Installation Matters
Mudsill bolting resists lateral earthquake forces, preventing the structure from sliding off the foundation. Improper embedment, missing bolts, or insufficient torque can cause catastrophic failure. We always recommend consulting a licensed structural engineer for site-specific designs.
Field Tips for Consistent Results
Use a rotary hammer with a depth stop for uniform embedment. Mark all locations before drilling, then work from one end to avoid omissions. Verify torque with a calibrated wrench and re-torque epoxy anchors after 24 hours if specified. Once bolts are installed, the next step is bracing the cripple wall.
Adding Cripple Wall Bracing for Lateral Support
After seismic retrofit foundation bolting in your home, the next step is cripple wall bracing in your crawlspace. This ties the mudsill to the floor framing, preventing collapse.
Cripple Wall Bracing Installation Step by Step
- Measure from the top of the mudsill (post mudsill bolting) to the bottom of the floor framing.
- Cut plywood panels to size, leaving a 1/8-inch gap for expansion.
- Install the panels from mudsill to floor framing, nailing with 8d common nails: 4-inch spacing on edges and 12-inch in the field.
Why Brace Cripple Walls
Unbraced cripple walls collapse under seismic shaking. Bracing transfers lateral forces to the foundation, preventing the house from sliding.
Practical Bracing Tips
- Leave a 1/8-inch gap between panels for expansion.
- Stagger nail rows in the field.
- Use hot-dipped galvanized nails for corrosion resistance (per ICC-ES AC358, which we follow) and consult a licensed engineer.
As a family-owned business since 1996, we recommend professional installation. Contact us for a consultation.
Selecting and Installing Anchor Bolts for Seismic Loads
Selecting the right anchor bolts is critical for effective seismic retrofit foundation bolting in Colorado, where seismic forces and expansive soils demand robust connections. Proper anchorage helps keep the house secured to its foundation during an earthquake.
Selecting Anchor Bolts for Your Retrofit
Wedge anchors are ideal for solid, uncracked concrete, while epoxy anchors and adhesive anchors work better in cracked concrete or high-load applications. We recommend a 5/8-inch diameter bolt with a minimum embedment of 7 inches into the foundation per IRC guidelines. Mudsill bolting connects the sill plate to the foundation, a key step in seismic retrofits that may also include cripple wall bracing.
Why Correct Anchor Selection Is Critical
In seismic retrofit foundation bolting, the wrong anchor can fail during an earthquake, pulling out or shearing off. Proper selection helps keep the foundation-to-house connection intact.
Anchor Bolt Installation Tips
Test concrete hardness with a hammer test before choosing the anchor type. Always follow manufacturer installation instructions for hole diameter, depth, and torque. Site conditions and installation quality are critical. Always consult a structural engineer for site-specific designs.
Integrating Helical Piers for Deep Foundation Support
When performing seismic retrofit foundation bolting, we integrate helical piers for deep foundation support. As The Experts in Steel Piers, family-owned and operated since 1996, our team brings superior performance to every project.
Installing Helical Piers in a Seismic Retrofit
We install helical piers with helix plates, steel shafts, and brackets attached to existing framing. Torque-driven installation using hydraulic motors verifies capacity through torque-to-soil resistance correlation. Our process complies with ICC-ES AC358 and adheres to ASCE earthquake retrofit resources for bolting and bracing integration. Piers load-test immediately, with no cure time.
Why Helical Piers Strengthen Retrofit Projects
These piers transfer foundation loads to deeper competent soil layers, reducing differential settlement and providing lateral resistance during seismic events. By reaching stable strata, they help maintain structural integrity. The immediate load testing ensures reliable performance, as required by ICC-ES AC358.
Installation Tips for Helical Piers
We coordinate helical pier placement with existing mudsill bolting and cripple wall bracing to avoid structural conflicts. Using galvanized piers for corrosion resistance in Colorado is essential. Always consult a licensed structural engineer for design recommendations; estimates are subject to on-site inspection.
Protecting Retrofit Components with Moisture Barriers
Protecting New and Existing Components
Once your seismic retrofit foundation bolting and cripple wall bracing components are installed, protecting them from moisture is the next critical step. We install a 6-mil polyethylene vapor barrier over the crawlspace floor, overlapping seams at least 12 inches and taping them with moisture-resistant tape. Each bolt penetration for mudsill bolting must be sealed with closed-cell foam. All new hardware should be corrosion-resistant, such as hot-dip galvanized with intact coatings. A perimeter drain system around the footing directs water away, reducing hydrostatic pressure. We recommend consulting a licensed structural engineer; our internal FAQ outlines how we coordinate inspections in Colorado.
Why Long-Term Protection Matters
Over decades, moisture and corrosion can cause section loss in steel bolts and wood decay in mudsills, potentially undermining the anchorage of seismic retrofit foundation bolting and reducing load capacity. Ensuring proper seals and drainage now prevents this gradual decay, preserving the retrofit’s long-term performance. Without protection, the retrofit may lose its effectiveness.
Sealing Tips for Durability
For bolt penetrations, use closed-cell foam sealant (never open-cell, which can absorb moisture). Ensure all vapor barrier seams are fully adhered using tape rated for below-grade moisture exposure. This creates a continuous moisture barrier that safeguards your foundation. Proper seam adhesion prevents water vapor from bypassing the barrier.
Documenting and Inspecting the Completed Retrofit
After completing your seismic retrofit foundation bolting in Denver, Colorado, the final inspection and documentation phase begins. We recommend consulting a licensed structural engineer and following this checklist.
Final Inspection Checklist
- Verify that mudsill bolting torque meets the manufacturer’s specification and the approved engineering plan.
- Inspect cripple wall bracing plywood for proper nailing and confirm no gaps at the sill plate connection.
- Check that all sill plates are tight and show no visible movement.
- If helical piers were installed, review load-testing reports to confirm adequate bearing capacity.
- Document any deviations from the plan and address concerns with your engineer.
Why Documentation Is Essential
Proper documentation is often required for permit close-out and may qualify homeowners for insurance premium discounts. It also provides proof of code compliance for future property transactions and refinancing.
Records Keeping Tips
- We recommend storing all project records digitally in cloud backup and in a fireproof safe at the property.
- Include the engineer’s stamped report, manufacturer product data sheets, and dated photographs of each installed component.
- Annotate photos with descriptions of the work and inspection results.
Troubleshooting Common Seismic Retrofit Installation Challenges
Even with thorough preparation, seismic retrofit foundation bolting projects in Colorado can present unexpected obstacles that demand immediate, informed solutions. At Rocky Mountain Steel Piering, Inc., we have encountered a wide range of field conditions over our decades of service across the Denver metro area, and we’ve developed reliable troubleshooting protocols to keep your project on track.
Poor soil conditions are among the most frequent challenges. In regions like Littleton and Centennial, expansive clay soils with low bearing capacity may be unable to support standard shallow foundations. When soil testing reveals insufficient strength, deeper helical piers or screw piles are typically required to reach stable, load-bearing strata. Our trained and certified installers perform real-time torque monitoring during installation to verify that each pier achieves the design capacity specified in the project’s engineering plan for both cripple wall bracing and mudsill bolting connections.
Compliance with ICC-ES AC358 governs every deep foundation we install. This standard mandates minimum embedment depths, torque-to-capacity correlation verification, and specific corrosion protection measures based on soil corrosivity classifications. In aggressive Front Range soils, hot-dip galvanizing and increased steel thicknesses are mandatory to ensure long-term durability. Our team’s familiarity with these requirements means we anticipate documentation needs—sealed engineering calculations, mill certificates, and signed installation reports—before the first pier is turned.
Underground obstructions and frost depth requirements present additional challenges that can disrupt installation sequencing. Our installers are experienced in adjusting pier locations and depths in the field while maintaining structural integrity. Because helical piers provide immediate loading capability with no cure time, adjustments can be made efficiently without delaying the overall schedule. However, a licensed structural engineer’s foundation report and on-site inspection remain essential before any seismic retrofit begins. These unbiased forensic evaluations identify underlying failure mechanisms and produce the sealed repair specifications that guide our installation work.
As a family-owned and operated company since 1996, we’ve built our reputation on solving foundation challenges that other contractors find daunting. If you encounter any of these issues during your seismic retrofit project, or simply want to ensure your home is prepared to withstand seismic events, our team is ready to provide a tailored solution. Contact Rocky Mountain Steel Piering, Inc. today to request your custom quote and benefit from The Experts in Steel Piers.
Securing Your Home with Professional Seismic Retrofit Foundation Bolting
Professional seismic retrofit foundation bolting is a critical process for safeguarding homes in earthquake-prone regions. The procedure involves two primary components: mudsill bolting, which anchors the home’s sill plate to the foundation, and cripple wall bracing, which strengthens the short wood-framed wall between foundation and first floor with plywood or metal connectors. As a family-owned and operated company serving homeowners in Denver, Littleton, and Douglas County, Colorado, our trained installers bring knowledge of local building codes, torque-controlled equipment, and on-site inspections to ensure proper installation—avoiding the risks of improper fastening or hidden issues that DIY approaches often miss.
Our team often integrates seismic retrofit bolting with other foundation repairs, including the settling foundation repair methods detailed in our FAQ—such as underpinning or helical piers—to correct any pre-existing issues before retrofitting. A structural engineer’s report, which our FAQ indicates typically costs between $500 and $1,500, is frequently required to assess conditions and design a code-compliant plan. In addition to foundation bolting, we also install stamped concrete in Denver, Colorado for decorative flatwork. This holistic approach helps protect your home’s long-term structural integrity.